Record Provisional Ballots
Texas provisional ballots serve two purposes:
![]() Cast a ballot for voter's whose eligibility to vote is in question:
Cast a ballot for voter's whose eligibility to vote is in question:
Provisional ballots are cast by voters who declare they are eligible to vote in a given precinct; however, their eligibility cannot be proven at the polls on Election day. For example, a voter may lack an acceptable form of identification or a voter's registration information was not properly processed. After provisional ballots are prepared, reviewed, and counted, they are transferred to the Ballot Board for final acceptance or rejection.
The provisional ballot form includes a signed affidavit of voter registration information.
So, when you process a provisional ballot, you first verify or add voter registration information, and then record the disposition of the ballot, which increments the total of returned mail ballots for reporting purposes.
The status of provisional ballots is Pending until the Ballot Board determines whether the ballot will be accepted. When you record the disposition of the ballot, the status changes to Tabulated or Not Tabulated, depending on the decision of the Ballot Board.
- The provisional ballots must first be scanned in Voter Focus. If this has not been done, go to Voter Registration > Scan Document. Select P - Provisional Ballot Applications as the Comm Type. See Use the Scan Documents Program for further instructions.
- Ensure that the correct election is in focus.
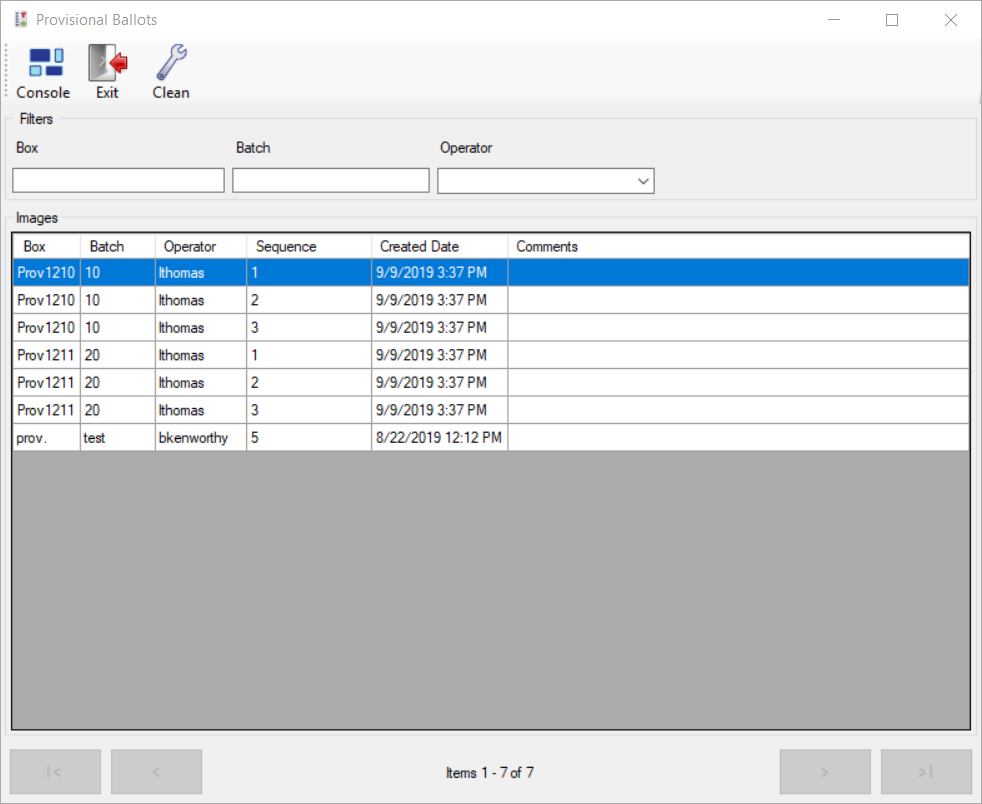
- Go to Elections > Record Provisional Ballot. The Provisional Ballots dialog displays. The image batches created and released from Scan Documents are available for selection.
- On the Provisional Ballots dialog, you can use the following to locate the row containing the batch to process:
- The filters above the grid to narrow the items that are listed.
- The arrows at the bottom of the dialog to navigate between pages.
- Double-click the row with the ballot images you want to record. The ballot images display in the Batch Images dialog.
-
On the Batch Images dialog, verify the signature is clipped, which should be on the first page if there are multiple pages.
- The clip code specifies the signature's horizontal and vertical position for that document type. If the clip code does not capture the signature portion of the image, left-click and drag your mouse around the signature in the Batch Details box (the top box).
- You can also do the following using the controls on the toolbar:
- Use Rotate to turn the image 90° in the Batch Details box, and then click Zoom In to enlarge the image for better clarity.
- Click Print to send the image to a destination of your choosing in the same orientation (rotation) as seen in the Batch Details box.
- If the request is obsolete or the image must be re-scanned, click Delete on the toolbar to remove the image from the queue, and then click Yes to confirm the deletion.
You can redo the signature clip as many times as needed.
- If the image is obsolete or must be re-scanned, click Delete on the toolbar to remove the request from the queue.
- You must have the DeleteProvBallotBatch user permission to view and use the Delete button.
- The list of clip codes is set in Admin > System Options > Clip Codes. The default clip code (the code that is listed first) is set in Admin > System Options > Image Indexing.
- If Detect Voter Ids from Barcodes in Batch Image Queues is selected in System Options and the voter is identified by the system from the barcode image, the Application Form displays. The form is pre-filled with information about the voter. In this case, skip the next step.
- If the barcode does not identify the voter or there is no barcode, the Find a Voter dialog displays. Use Application Search to verify if a record exists for the voter. One of the following occurs:
- Voter records exist. The Voter at a Glance dialog lists all voters who match your search criteria. Do one of the following to open the Application Form:
- Highlight the correct voter from the list and click Application is for this Voter.
- Click New on the toolbar to create a new voter record.
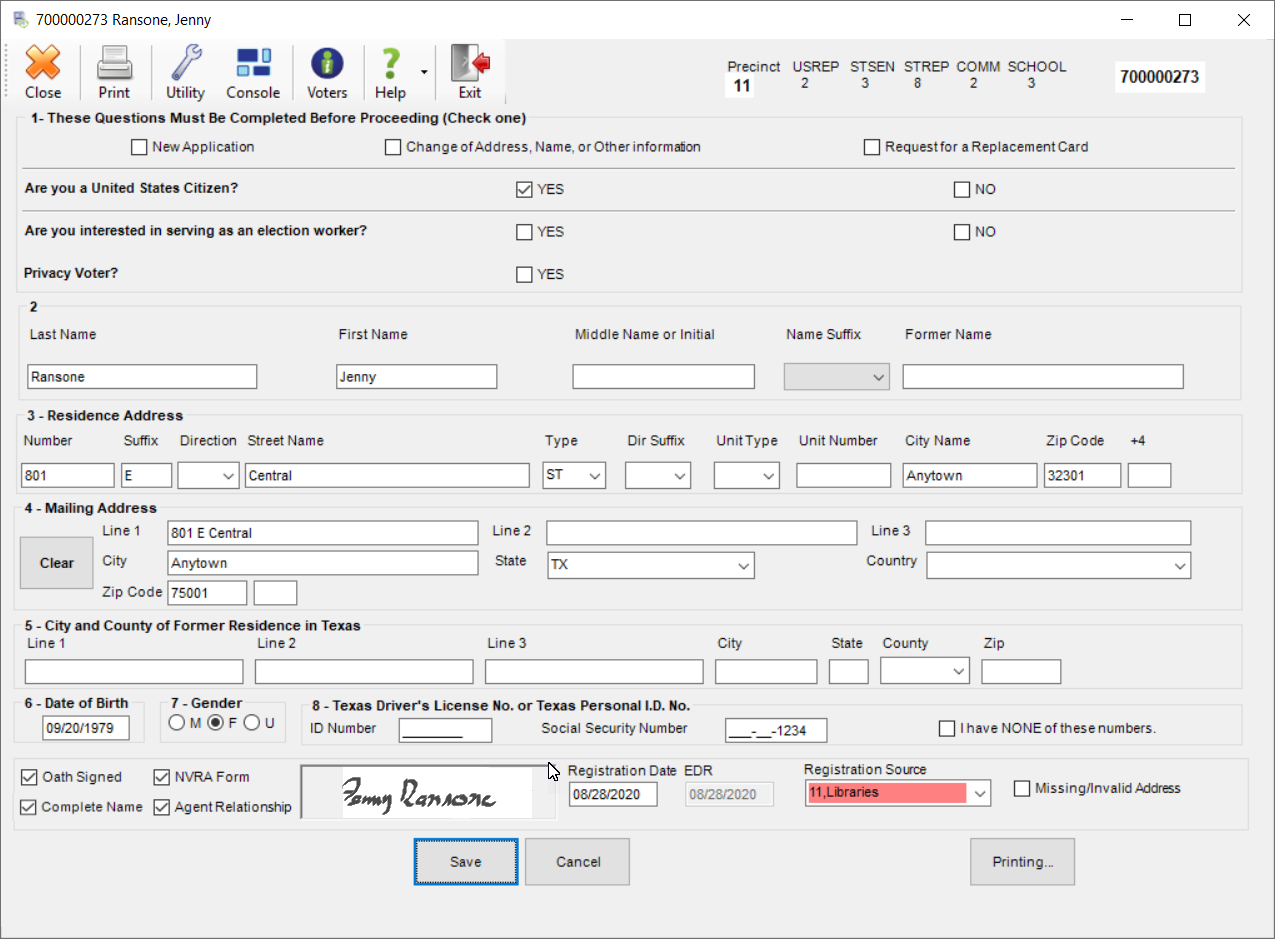
- No voter record exists. If there are no voters in the Voter Focus system that match your search results, a new voter Application Form displays.
-
Complete the voter application form, selecting 53, Provisional as the Registration Source.
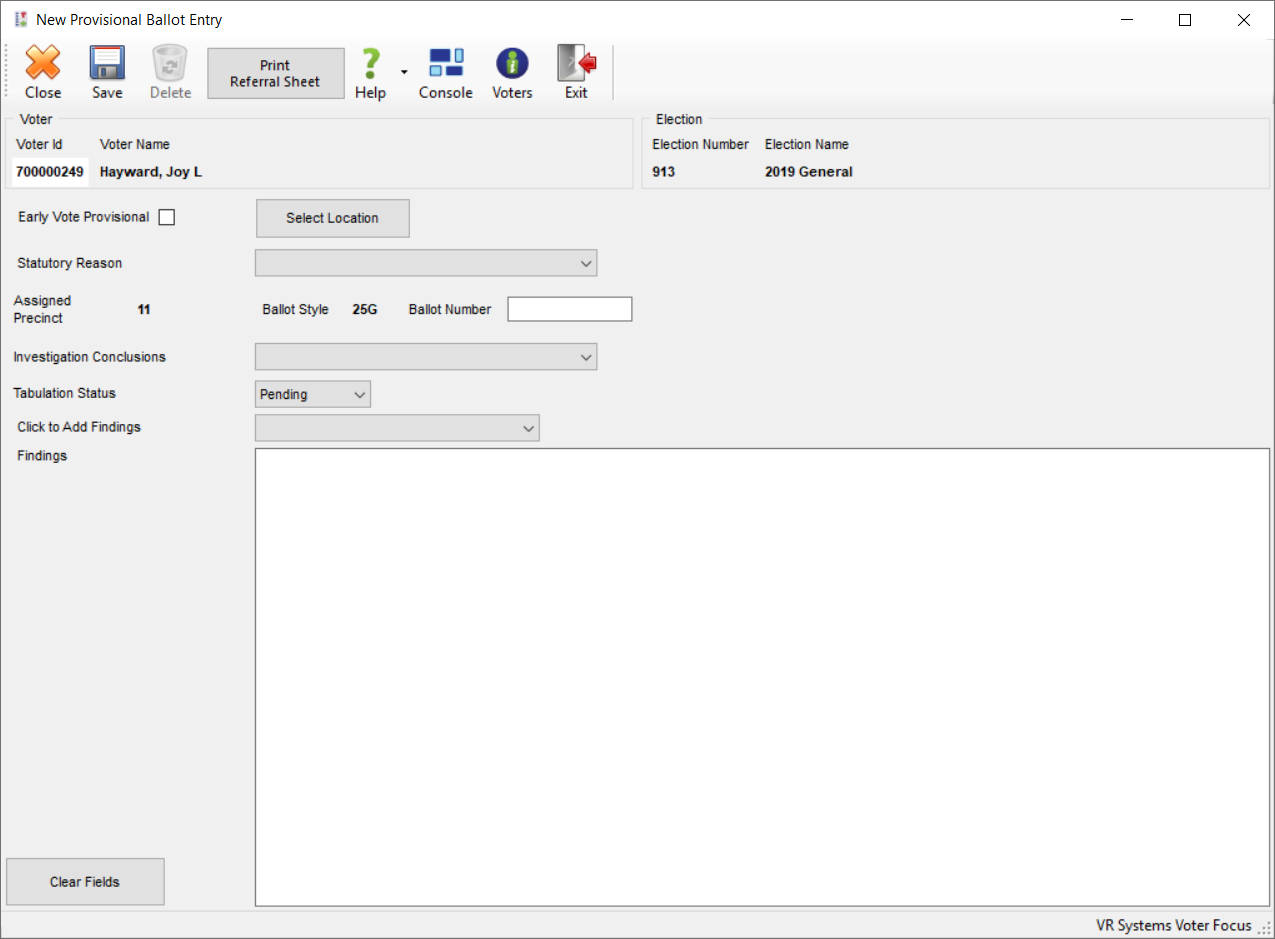
- Click Save. The New Provisional Ballot Entry dialog displays.
- Select Early Vote Provisional if the provisional ballot is being issued during the early voting period. When enabled, the voting method that is exported for TEAM changes from Election Day (ED) to Early Vote (EV).
- Click Select Location to select from the list of voting locations.
- Click the Statutory Reason box and select a reason that the provisional ballot was issued to the voter. The options available in this field are those mandated by state law and are maintained by VR Systems.
- If available, enter the ballot number.
- Select the reason for ballot acceptance or rejection from the Investigation Conclusion list:
- Select the current status of the voter's ballot.
- If the Ballot Board has not yet made a decision on the validity of the ballot, leave the default Tabulation Status as Pending.
- If the Ballot Board rejected the voter's provisional ballot, change the Tabulation Status to Not Tabulated.
- If the voter's ballot was accepted by the Ballot Board and has been tabulated for the election, select Tabulated.
Note: If the ballot is set as either Not Tabulated (rejected) or Tabulated (accepted) and the voter has no history of voting in any primary election for the current calendar year, the system sets the voter's party affiliation. - If you have any comments to add, enter them in the Findings field. The purpose of this field is to record information gathered by the elections office as to the voter’s eligibility in this election or to document the reason for tabulation or rejection of a provisional ballot. You can insert a finding from the standard list, type in your own text, or add a standard finding and amend it. To insert a finding from the standard list, select the finding you want from the drop-down list labeled Click to Add Findings.
- Click Save to save the changes to the record. The ballot images are indexed to the voter's record.
- Go to ELECTIONS > Reconcile History > Update Voting History to add the Voted Early by Provisional Ballot to the Elections tab in the voter's record.
- Schedule printing of the Provisional Disposition Letter to advise the voter whether the provisional ballot was tabulated or rejected. If the ballot was rejected (not counted), the letter also includes the reason why.

| Reason | Accepted/Rejected |
|---|---|
| Voter presented acceptable form of identification or a supporting form of identification and... | Accepted |
| Voter met disability exemption within 6 days of election day | Accepted |
| Voter executed religious objection affidavit within 6 days of election day | Accepted |
| Voter executed natural disaster affidavit within 6 days of election day | Accepted |
| Voter did not satisfy identification or affidavit requirements, listed in categories 1-4... | Rejected |
| Not a registered voter or registration not effective in time for this election | Rejected |
| Registered to vote, erroneously listed in wrong precinct | Rejected |
| Registered to vote in a different precinct within the county | Rejected |
| Information on file indicating applicant completed a voter registration application, but it was never received... | Accepted |
| Voter erroneously removed from the list | Accepted |
| Voter is not registered to vote in political subdivision | Rejected |
| Voter has already voted | Rejected |
| Other (please explain) | Accepted |
You can view the provisional ballot record by opening the voter's record, clicking the Elections tab, selecting the election, and clicking Provisional. The Provisional Ballot Inquiry dialog displays. You cannot make changes to the provisional-ballot record from this dialog; it is intended for inquiry only.


