Last Updated: 06/27/2024
Ballot Printer
This feature lets you change the ballot-printing interface and connection information for the EViD station.
This capability is also available in EViD Maintenance and the Remote Tech Utilities program.
Note:
- For information on setting Ballot Printer settings for EViD DirectPrint, see the EViD DirectPrint Setup Guide in the User Community.
- For information about setting up EViD stations to print to ExpressVote printers, see Install and Configure ES&S ExpressVote Printing.
- On the
Tech Utilities dialog,
touch Ballot Printer.
- Select the type corresponding to your ballot-printing
vendor.
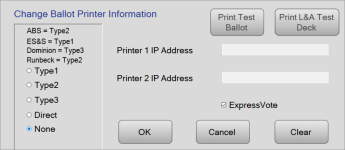
- Depending on your vendor selection, you may need to enter an IP address for the ballot printers in the Printer 1 IP Address and Printer 2 IP Address fields.
- If your type is 2 or 3 or you are using DirectPrint, you have the option of printing a test ballot to verify that the EViD/ballot printer connection is working. Touch Print Test Ballot to do the print test. If all goes well, you will see the message Ballot information successfully sent to printer.
- Touch OK to save your changes. Or, touch Back to return to the Tech Utilities dialog without applying any changes.

Test ballots can be printed from the Print Test Ballot option on the Clerk Utilities dialog on EViDs configured for a Type 2 or 3 ballot printer as well as DirectPrint. See the EViD Clerk Guide or the EViD Early Voting Guide in the VR User Community for more information.


