Select Image Batch
To access: VOTER REGISTRATION > Scan Documents
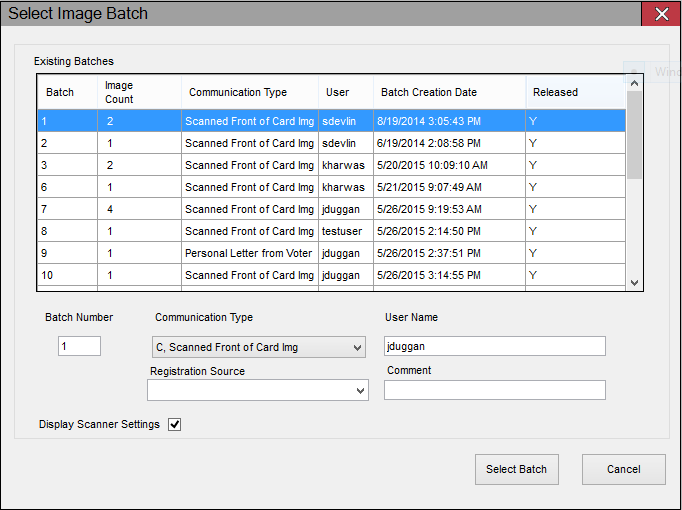
On this dialog, you identify the batch into which a group of like documents will be scanned. You can select an existing batch and scan more images into it or you can create a new batch. All images in a batch must have the same communication type and user name. Once a batch has been created, the communication type and user name cannot be changed.
Previously created batches containing images that have not been indexed yet appear in the Existing Batches list.
The number in the Image Count column indicates the number of images held in the folder I:\WorkSig for the batch. When an image is indexed to a voter record, the image is moved out of \WorkSig, so the image count is decremented by one. The image count will also be affected if a previously scanned image is deleted during the scanning process (that is, by clicking Delete this Image on the Scanning Progress dialog.) Once a batch has been emptied of its images, the batch will disappear from the list and its number will be released for reuse after 48 hours.
For counties using the Scan First feature, batches with the communication type C, Scanned Front of Card Img are not available to users processing voter applications until the user clicks Release Batch on the Scanning Progress dialog. This prevents users on the application-processing side from moving images out of the batch while users on the scanner side are still scanning, verifying that images are good, and reconciling images with paper applications. Batches that have been released have a Y in the Released column in the Existing Batches list. (This column appears only in counties using Scan First.) Once a batch has been released, you cannot access the batch to add or remove images. The image count will be lowered when a user processes an image against an application, which indexes the image to the voter record, moving it from \WorkSig to the permanent network location designated for indexed images. The image count will also be decremented if a user processing applications marks an image as "Bad."
For more about the scanning and indexing process, see About Scanning and Indexing of Application Forms and Other Documents
Fields and Controls on this Dialog
|
Batch Number |
Documents must be assigned to a batch—either an existing batch or a new one. You can use an existing batch by entering its number here or just clicking the batch number in the list of existing batches. To create a new batch, enter an unused number. Batches can be numbered between 1 and 999. |
|
Communication Type |
Select the communication type that will be applied to the images in the batch you are about to scan. If you are scanning images into an existing batch, you must use the communication type previously assigned to the batch. Note: If
you need to change the communication type on an image, you can
do so during indexing.
The drop-down list shows all communication types in your system that have the option Image Expected for this Communication selected in VOTER FOCUS ADMIN > System Codes > Communication Type Codes. When scanning application forms for new voters, it is important that you choose C, Scanned From of Card Img as the communication type. This will ensure that the voter's signature and application form images are sent to FVRS at the time they are indexed to the voter's record. It is equally important to avoid using C, Scanned Front of Card Img when scanning other types of documents, which should not be sent to FVRS. |
| Registration Source | Select the registration source that will be applied to the images in the batch you are about to scan. If you are scanning images into an existing batch, you must use the registration source previously assigned to the batch. Once a registration source is assigned, the registration source will automatically be inserted into the source field on the application form when processing the application. |
|
User Name |
This field is prefilled with the user name of the user who created the highlighted batch. If you are are creating a new batch, you will need to change the name to your user name. If you are viewing or adding to an existing batch created under a different user, you should keep the original user's name; you cannot change it to your user name. |
|
Display Scanner Settings |
Select if you want to see the native settings dialog(s) for your scanner the first time you click Scan More Pages on the Scanning Progress dialog. (The native dialog always appears the first time you access the batch to scan documents, regardless of the setting here.) If you are scanning voter registration forms—which will be sent to FVRS and are therefore subject to the State's 200 KB limit on image files—you should verify that the scanner's black-and-white option is selected. Note: For
some communication types, the Display Scanner Settings option
is selected by default, but you can turn it off if you are satisfied
with the scanner settings for those communication types.
|
|
Comment |
Optional. Enter text to be associated with the batch. It will appear in the Batch Comment column on the Image Batch Selection dialog during indexing (and for counties using the Scan First feature, the Scanned Applications dialog during application processing). |
|
Select Batch |
Click to proceed to the Scanning Progress dialog where images can be scanned into the selected batch. |