Customize the Merge Document Used by the Print List Feature
The Print List button is found on the Search Results tab of the Worker Flexible Search dialog. Clicking it launches a program that exports the search results to a Microsoft Word mail merge document. This document, which is formatted as a table, displays each worker's information in a separate line.
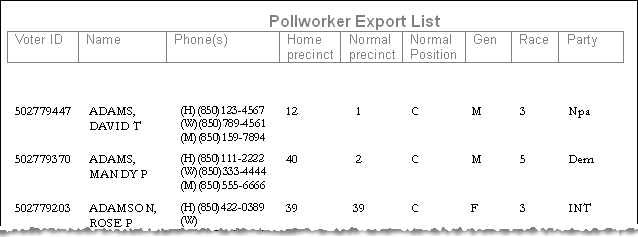
For each worker, these columns of data are provided:
|
Voter registration ID |
Home precinct |
Gen (Sex) |
|
Name (in Last, First Middle format) |
Normal precinct |
Race |
|
Phone numbers (home, work, mobile) |
Normal position |
Party |
The Print List output can be customized to suit the needs of your county. You can delete columns you don't need and add these columns to pull more information from the database:
|
Last_Name |
PWActive |
PayrollID |
|
First_Name |
Certification |
SchoolYTD |
|
Voter_Name_FML |
DateLastWorked |
YTDPay |
|
Mailing_Address |
ElecLastWorked |
YTDYear |
|
Mailing_City_State |
PosnLastWorked |
TermDate |
|
Mailing_Zip_Country |
DateLastContact |
BirthDate |
|
Residence_Address |
TimesContacted |
WorkPrc |
|
Residence_City |
Hired |
Languages |
|
Residence_Zip |
UnavailableUntil |
DriverLicense |
|
|
|
SSN_9 |
To customize the output, you edit the Word merge document used by the Print List feature—pwexportmergelist.doc. You should understand that any changes you make to pwexportmergelist.doc are effective system-wide; that is, the customized version will be used whenever the Print List feature is run by any user. If you want to create a list that's just for your own use, leaving the standard version of pwexportmergelist.doc intact, see Create a Mail Merge List of Workers Found in a Search.
The remainder of this topic explains how to customize pwexportmergelist.doc.
If you plan to add columns to pwexportmergelist.doc, you first need to create a merge data file. From this data source, you can then add the merge fields.
- Go to ELECTION WORKERS > Worker Flexible Search.
- On the Worker Flexible Search dialog, click Search. The specific search criteria aren't important here, because we won't be using the results list, only the resulting merge data file.
- On the Search Results tab, click Print List. You'll see the highlight bar move through each worker in the search results list. When the highlight bar stops, the Windows Print dialog is displayed. Click Cancel to dismiss the dialog because we aren't printing anything right now.
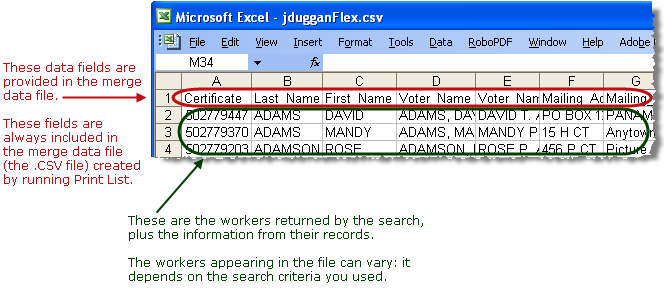
While all this is happening, the system is also working in the background to create a merge data file named:
<your operator name>flex.csv
in the folder:
I:\Vr6Sharedbinaries\Work
The merge data file isn't displayed to you, but if you want to examine it, use Windows Explorer to find and open it the Microsoft Excel The file looks something like this:
- In Windows Explorer, locate the file pwexportmergelist.doc in the folder I:\Vr6Sharedbinaries\Docs.
- Make a backup copy of pwexportmergelist.doc, namiing
the copy something like pwexportmergelist–original.doc. The backup
copy won't be used here; it's just good practice to make a backup
whenever you are change an original file in the \Docs folder.Note: If you want to create a personal version of pwexportmergelist.doc for your own use—leaving the standard version intact for other county users, don't create the backup file as described here in step 2. Instead, create a copy of pwexportmergelist.doc and save it under a name that includes your user name, such as pwexportmergelist-cfowler.doc. (You can save the file anywhere on the network that's convenient for you, but we suggest saving all merge documents in I:\Vr6Sharedbinaries\Docs.) Then continue with the instructions below, making edits to your personal version of pwexportmergelist.doc. When your edits are saved and you want to create a list using your newly edited document, follow the instructions in Create a Mail Merge List of Workers Found in a Search.
- Highlight the file pwexportmergelist.doc and double-click to open it. Microsoft Word will start.
- If you see the message Opening this document will run the following SQL Command...Do you want to continue?, click No to open the document without accessing the merge data file shown in the message. We don’t need that file and will open <your operator name>Flex.csv in a following step.
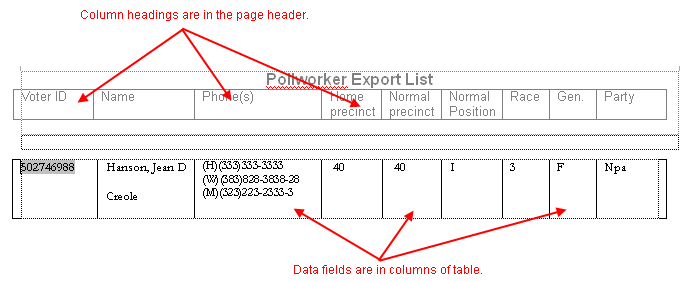
Let's examine the Word file. As mentioned above, the file is formatted as a table, with a column for each merge data field drawn from the Voter Focus database. The column headings are in a separate table, which is in the page header. The report title is also in the page header; it's simply a line of text and can be edited as you would any text in Word.
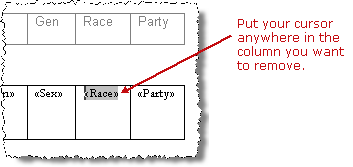
- To delete a column from the table, such as the Race column, place your cursor
anywhere in the column you want to delete. In our example, you would
put the cursor in the next-to-last column:
- Perform the delete operation:
- Word 2003—Click Table > Delete > Column.
- Word 2007—Click Layout > Delete > Delete columns.
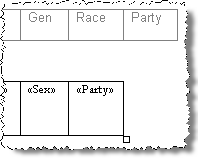
The column disappears:
- To edit the page header:
- Word 2003— Click View > Header and Footer.
- Word 2007— Click Insert > Header > Edit Header.
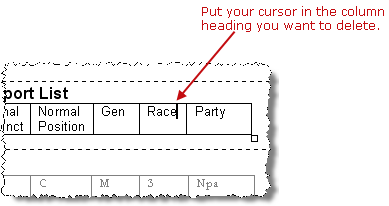
- Position your cursor in the column heading you want
to delete and perform the delete operation:
- Word 2003—Click Table > Delete > Column. Then click Close on the Header and Footer toolbar.
- Word 2007—Click Layout > Delete > Delete
columns. Click the Design
tab. Then click
 on the Close Header and Footer
button.
on the Close Header and Footer
button.

You will also want to delete the corresponding column heading. As noted earlier, the headings are located in the page header.
After the column removal—and a text change to the report title—our example looks like this:
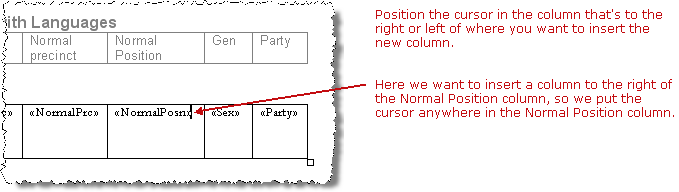
- Position your cursor in a column where you want to
add a column to its left or to its right.
For our example, we want to insert a column labeled Languages between the Normal Position and the Gen columns, so position the cursor in the Normal Position column:
- Perform the insert operation:
- Word 2003—Click Table > Insert > Columns to the Left or Columns to the Right, depending on where you want to add the column.
- Word 2007—Click Layout > Insert Left or Insert Right, depending on where you want to add the column.
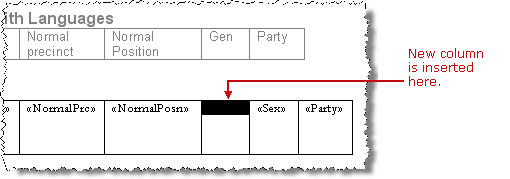
In our example, we inserted a column to the right, and this is the result:
- Select a merge data file:
- Word 2003—Click Tools > Letters and Mailings
> Show Mail Merge Toolbar. In the Mail Merge toolbar, click
the Open Data Source icon.

- Word 2007—Click the Mailing tab. Then
click Select Recipients > Use Existing
List.

- Word 2003—Click Tools > Letters and Mailings
> Show Mail Merge Toolbar. In the Mail Merge toolbar, click
the Open Data Source icon.
- In the Select
Data Source dialog, navigate to the merge data file you created
at the beginning of this procedure and double-click it:
I:\Vr6Sharedbinaries\Work\<your operator name>Flex.csv
- Insert the merge data field into the new column:
- Word 2003—Position the cursor in the column you created in step 1 and click the Insert Merge Field icon.

- Word 2007—Position the cursor in the column you created in step 1 and click the Insert Merge Field button.

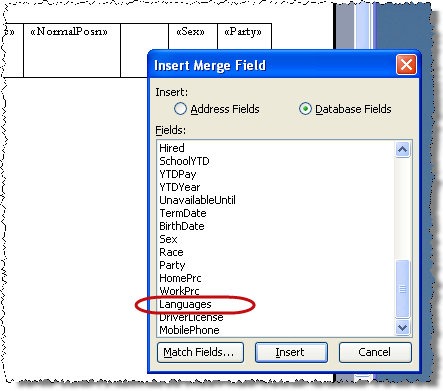
- In the Insert Merge Field dialog, make sure Database Fields is selected.
- Scroll to the field you want to display in
the column and click Insert.
For our example, we select the Languages field:
- Click Close.
The data field will be inserted in the first row of the new column. (You
might want to increase the width of the column to accommodate the data
that will be there after the merge.)
- Add a column heading for the new column by editing
the page header. To do this:
- Word 2003—Click View > Header and Footer. Position your cursor next to the column where you want to add a column and click Table > Insert > Columns to the Left or Columns to the Right. Type the column heading into the field. Then click Close on the Header and Footer toolbar.
- Word 2007—On the Insert tab, click the Header icon:

Click Edit Header. Position your cursor next to the column where you want to add a column and click Layout > Insert > Left or Insert > Right. Type the column heading into the field. Click the Design tab (under Header Footer Tools). Then click
on the Close
Header and Footer button:
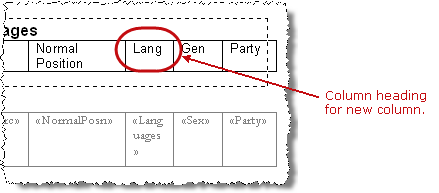
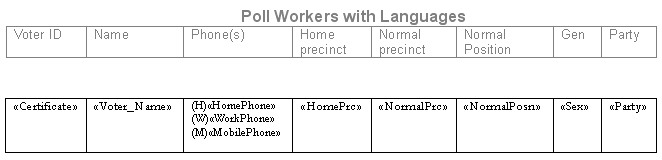
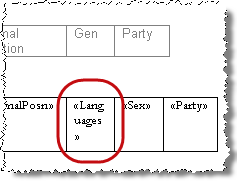
After the column insertion, our example report looks like this:
- When pwexportmergelist.doc is set up as you want it,
save and close it.Note: If instead of modifying pwexportmergelist.doc, you created a personal version of the document under a different file name, see Create a Mail Merge List of Workers Found in a Search for instructions on creating a list using your personal version.
- Go to ELECTION WORKERS > Worker Flexible Search.
- On the Worker Flexible Search dialog, define your search criteria and click Search.
- On the Search Results tab, click Print List. You'll see the highlight bar move through each worker in the search results list. When the highlight bar stops, the Windows Print dialog displays.
- Select the printer where you want to print the list. If you don't want to print the list—you only want a digital file or you want to view it onscreen—select any printer. You will have the opportunity to cancel the print and save the file in a moment.
- Click OK on the Print dialog. Voter Focus generates the list using the newly modified pwexportmergelist.doc and opens the list in Word under the file name Catalogn and will also display a message instructing you to switch to Word.
- As the instructions indicate, you can now switch to Word and print or save the list. Clicking OK on the instruction dialog closes the Word documents.
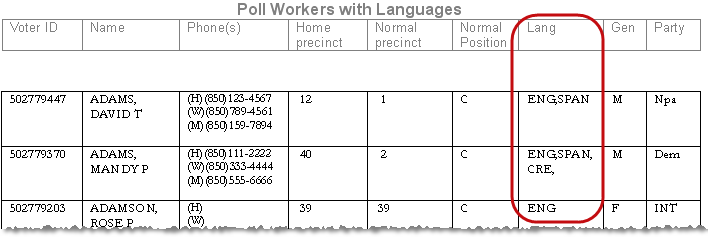
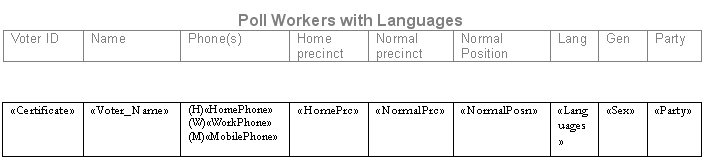
After doing a Print List operation against our customized version of pwexportmergelist.doc, the report looks like this, with the languages spoken by the workers meeting all search criteria shown in the Lang column: