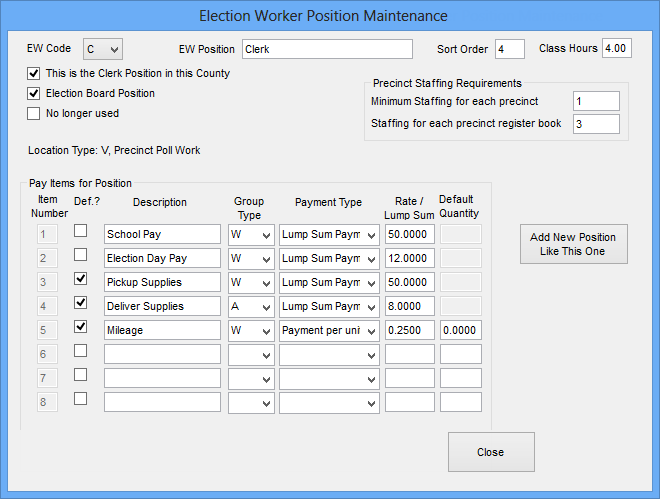
Election Worker Position Maintenance
To access: ELECTION WORKERS > EW Utilities > Election Worker Admin > Position and Pay Rate Maintenance
Use this dialog to create a position to which workers can be assigned to work.
Fields and Controls on this Dialog
|
EW Code |
A code of up to 2 characters used as a shorthand ID for the worker position. This is the "control field" for the other fields on this dialog. The drop-down list shows all worker positions available for the selected work type. If you want to create a position in your work type mode similar to a position in another, select the position you want to copy and click Add New Position Like This One. Note that worker position codes must be unique across the system: you cannot have a C in precinct poll work mode and a C in early voting work mode. |
||||||
|
EW Position |
Enter the name of the position as you want it to appear on reports and dialogs in Voter Focus. |
||||||
|
Sort Order |
Many of the election worker reports sort workers by position. The number you enter in the Sort Order field specify this position's place in the sort order. The position with the lowest number (such as 1) will appear first in lists. If two or more positions have the same sort order number, those positions will be ordered alphabetically within their position in the sorted list. The sort order also applies on dialogs where worker positions are listed, such as the Election Work tab in worker records. |
||||||
|
Class Hours |
Enter the number of class hours workers in this position must complete in order to work an election. You will be allowed to assign workers to the position who don't have sufficient class hours, but the Election Worker Class Hours report will indicate that they need more class hours before they can work in that position. |
||||||
|
This is the Clerk Position in this County |
One position in the system should be designated as the Clerk position. The name of the position need not be Clerk. The Clerk position is picked up by certain reports and mail merge documents along with the Clerks' names and phone numbers. Only one position can be defined as the Clerk position. If you already have a position defined as the Clerk and you select This is the Clerk Position in this County for another position, the check box on the previous Clerk position is cleared automatically. |
||||||
|
Election Board Position |
Select this option for positions defined by Florida law as election board positions—that is, Clerk and Inspector positions, which are limited to local registered voters. This field is intended to prevent assignment of out-of-county workers to election board positions. When selected, the position will not appear in the drop-down lists for Normal Position (on the General tab) and Position (on the Election Work tab) in the worker’s maintenance record. |
||||||
|
No longer used |
Selecting this check box lets you hide a position that is now obsolete. The position will no longer appear in lists of positions in worker-assignment areas for future assignments. Should the position become active again, it can easily be resurrected by clearing the check box. |
||||||
|
Precinct Staffing Requirements |
These fields the Precinct Staffing Requirements box, you can specify:
Both fields are optional. Values entered here are used by the Election Worker Staffing Levels report to calculate how many workers in each position are needed at each precinct. If you enter values in both fields, the report uses the greater number to determine required staffing levels. |
||||||
|
Location Type |
Displays the work type mode for the currently selected position. You can only modify the settings of positions belonging to your current work type mode. |
||||||
|
Pay Items for Position |
Up to eight pay items can be defined for each worker position. Once you have begun adding or deleting a pay item, you cannot make changes to existing pay items. You will need to click Save to complete the addition or deletion, then return to the position to make changes To add a new pay item, type its name in the Description field, fill out the remaining fields for the pay item, and click Save to complete the add. To change a pay item, enter the changes and click Save. To delete an individual pay item, clear the Description field and tab out of it to clear the other fields for this pay item. |
||||||
|
Item Number |
A display field indicating the number of the pay item. Up to eight pay items can be earned by a position. |
||||||
|
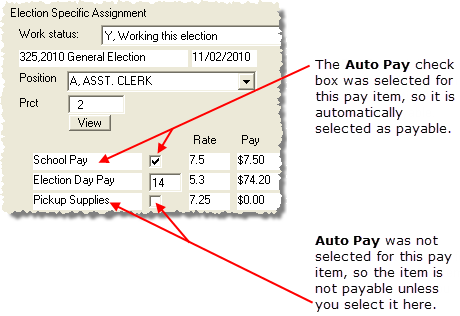
Auto Pay |
Select this check box to have this pay item automatically selected as payable when a worker is assigned to the position. The selection appears on the worker's Election Work tab, as shown here.
|
||||||
|
Description |
A brief description of the position. Most counties enter just the position title, such as Clerk. This description appears on many election worker reports and dialogs. |
||||||
|
Group Type |
Indicates whether this pay item is limited to active workers, alternates, or both:
|
||||||
|
Payment Type |
Indicate how the pay is calculated:
|
||||||
|
Rate/Lump Sum |
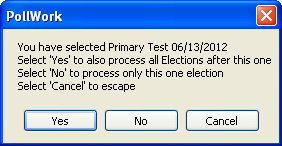
If Payment Type is Lump Sum Payment, enter the dollar amount to be paid for the item. If Payment Type is Payment per Unit, enter the dollar amount per unit (hours or mileage). If you make a change here, after clicking Save you will be asked to confirm the changes made for this position. After clicking Yes, you are then asked if you want to update existing Election Worker records. If you click Yes, the Select Election dialog opens to select the election where you want the change to be applied. After clicking OK, the following message displays:
Click Yes to apply the change to all work assignments in the selected election and all subsequent elections. Click No to apply the change only to all work assignments in the selected election. |
||||||
|
Default Quantity |
This field is available only when the payment type is Payment per Unit; a value here is not required. It allows you to define a number of hours or miles as the default amount for this pay item. For example, if election day pay is always 14 hours, you would enter 14 in the Default Quantity field. You can change the default quantity on an individual worker's Election Work tab, if their hours/mileage does not match the default. Unlike change to the Rate/Lump Sum field, changes to Default Quantity apply only to pay items where Auto Pay is selected and then only to subsequent work assignments, regardless of the election. Any work assignments made prior to the change will not be affected. If you want the change to apply to existing work assignments, you will need to update individual worker records manually. |
||||||
|
Add New Position Like This One |
Copies the pay items from the currently displayed position to a new position so that you can define the new position. When you click this button, you are asked to enter a position code for the new position. This code is then inserted in the EW Code field for the new position. |
||||||
|
Delete This Position |
This button does not appear if any workers are assigned to work this position or the position is defined as any worker's normal position. It deletes the currently displayed position and its pay items. |
||||||
|
Save |
This button appears when you are adding, changing, or deleting something on the dialog. Click Save to save the changes to the database. |
||||||
|
Close |
This button appears when no changes have been made to the dialog or all previous changes have been saved. It allows you to exit the dialog and return to the Election Worker Utilities dialog. |
||||||
|
Cancel |
This button appears when you are adding, changing, or deleting something on the dialog. Clicking Cancel gives you the opportunity to abort the changes and return all values to what they were when you retrieved the position record. |