This feature lets you make a screenshot of the current state of the EViD display. This can be helpful when a remote technician is troubleshooting an issue with the EViD user and is not sure what the user is seeing on screen.
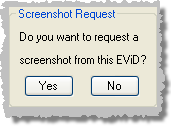
To take a screenshot, click the Screenshot Request button in the Functions list. You will see the following box:
Click Yes to take the screenshot. You will see the message Screenshot Succeeded follwed by the appearance of the screenshot on your monitor. You can save the screenshot by clicking the Save to File button in the upper-left corner of the form where the screenshot is shown. Click Exit to dismiss the screenshot.