|
Last Update: April 07, 2014 |
Dialog Help
To access: CANDIDATE SERVICES > Candidates > New or Maintain Candidate

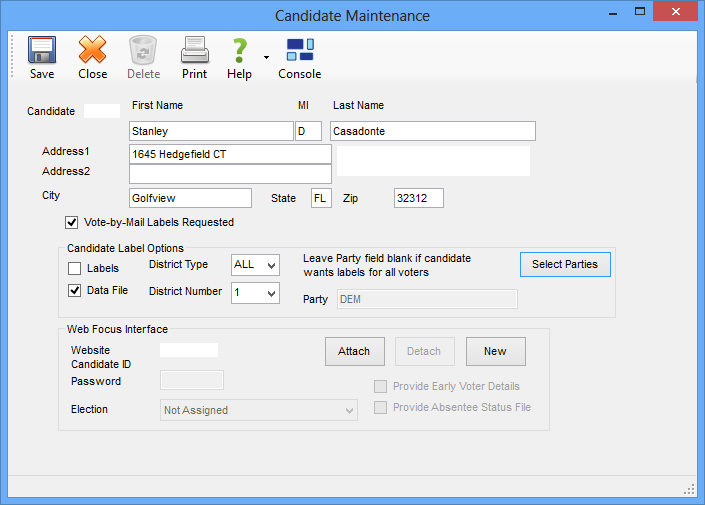
This dialog lets you create and maintain a record for a candidate in an election or a committee with an interest in a race or referendum. On this dialog you can also set up the candidate/committee to receive vote-by-mail information in the form of:
printed mailing labels
a text file of mailing-label data that can be emailed to the candidate/committee, copied to portable media such as a CD, or posted to your website.
Note For website posting, you must have VR Tower and the Campaign Financial Reporting service, which are VR Systems products sold separately from Voter Focus.
Fields and Controls on this Dialog
Candidate—This is a display field that shows the candidate number assigned by Voter Focus.
Candidate Name and Address—Enter the first name, middle initial, last name in upper- or lowercase. The name appears on the header and trailer labels printed with labels and files produced for the candidate.
In the case of a committee, enter the committee name in the Last Name field and leave the other name fields blank.
The name and address you enter here are not compared to existing information in the Voter Focus database. For example, the validity of the street address is not checked against the street table. However, if you plan to post the mailing-label files to your website and the candidate/committee already has an account in the Campaign Financial Reporting service, the name and address you enter here will be compared to the web service information when you attach to the web service account. If the information in the two systems is not exactly the same, you will get a warning message. You can disregard the message and proceed with differences in the two records, but if you want to avoid the warning message, verify that the information you enter here is the same as that in the Campaign Financial Reporting service.
Vote-by-Mail Labels Requested—Select this option box if the candidate/committee requests information on mail-ballot voters, regardless of the delivery format they want. Selecting this option causes display of the Candidate Label Options and VR Tower Interface fields, described below.
Candidate Label Options—Select Labels if the candidate/committee wants printed mailing labels for mail-ballot voters. Select Data File if they prefer instead a digital file of voter information. The file is produced in TXT format and file can be delivered to the candidate/committee in one of several ways:
Saved to portable media (diskette/CD)
Saved to your computer or a network location and emailed to the candidate/committee.
Posted to your website where the candidate/committee can access it via a secure login account.
District Type, District Number, and Party—Entries in these fields specify the mail-ballot voters whose information the candidate will receive. If the candidate has requested all voters, select ALL in the District Type field and 1 for District Number. Otherwise, select the district and number the candidate requested.
If the candidate is not running in a party-specific race such as a primary election, leave the Party field blank. This will give the candidate information on all mail-ballot voters in the specified district. Note that if you select NPA in the Party field, the candidate label/file run will be limited to no-party-affiliation and minor-party voters who have requested mail ballots.
Delete—Click to delete this candidate record from the election.
VR Tower Interface—The box at the bottom of the dialog sets up a candidate to obtain files and reports on your website via a login account.
Website Candidate ID—This is a display field that shows the user ID for the candidate's login account for the Campaign Financial Reporting service on your website. In the case of a candidate who does not already have an account, the field will display Pending while you create the account.
Password—This field contains the password for the candidate to use to log in to the website. In the case of candidates who already have a website account, the password is picked up from the account. If you are creating an account for the candidate, you will need to specify a password. There are no restrictions on the password format, but we recommend that you use a password that unauthorized users would not easily guess.
Election—Displays the election that the candidate is assigned to. The list of elections displayed in the drop-down list in this field is picked up from the Campaign Financial Reporting service, so it does not necessarily match the list of elections in Voter Focus in terms of elections listed or election names. But you should select the name that corresponds to the election you are currently working with in Voter Focus. If the candidate already has a web account, this field is filled in when you attach to the account.
Attach—Click if the candidate already has a login account for the Campaign Financial Reporting service. Voter Focus will search the CFS service and display any candidates by the same name on the Possible Web Candidates dialog. Highlight the candidate you want and click Select to insert the candidate's data in the Website Candidate ID, Password, and Election fields.
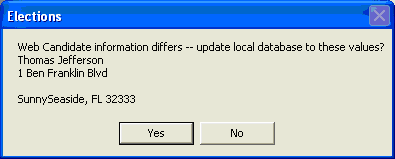
A dialog with a message similar to this might appear if the candidate information stored in the Campaign Financial Reporting service does not exactly match the candidate information in Voter Focus. For example, if the candidate's name or address is not spelled the same.

To copy the information from the Campaign Financial Reporting service to Voter Focus, click Yes. Click No to leave the Voter Focus information as it is. You can change either record later, if you want.
Detach—Click to detach the candidate's record in Voter Focus from their web account. Detaching does not affect the web account.
New—Click to create an account for the candidate on the Campaign Financial Reporting service on the website.
Note If this candidate is required to file campaign-financial reports with the elections office, you will need to add more information to their newly created record on the Campaign Financial Reporting service.
Provide Early Voter Details—Select to give the candidate access to the following files posted to your website: The daily early-voting-status report, the early-voting summary, and the EViD Get Out the Vote (GOTV) report (EViD counties only).
Note The GOTV report must be set up to automatically post a copy to the candidate area of your website. To set this up, go to EVID > Get Out the Vote Report and select the option Queue Files for Web. For more information, see How to Give a Candidate Access to the GOTV Report on Your Website.
Provide Absentee Status File—Select to give the candidate access to the daily absentee-status report posted to your website.