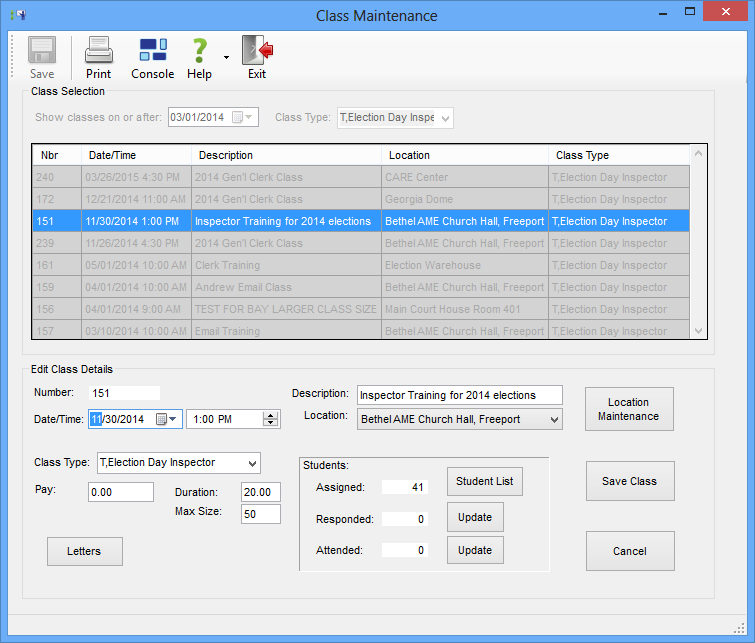
Class Maintenance
To access: ELECTION WORKERS > Train Workers
Fields and Controls on this Dialog
Icons
|
New |
Appears only when no class is selected in list. Click New to clear the fields in the Class Detail box so you can enter details for a new class. To copy a class, click the down-arrow on the New icon and then click New Class (like this one) to increment the Number field and clear the Date & Time field but leave the other fields as they were for the previous class, so you can create a new class with the same attributes as the previous one. To copy information from the currently displayed class to a new class, click the down-arrow on the New icon and then click New Class (like this one). A new number will be assigned automatically and the Date & Time field will be cleared. You can then edit the information for the new class. See Create a Class for Election Workers for more information. |
|
Find |
Appears only when no class is selected in list. Lets you select a class—by number—to display in the Edit Class Details box of the dialog. Click to open the School Number dialog, where you can enter the class number. The search is limited to classes within the type selected in the Type field. |
|
Save |
Click Save after making any edits to fields in the Edit Class Details box to save the changes you made. |
|
Delete |
Appears only when no class is selected in list. The Delete icon lets you delete a class. This icon is available only when there are no students assigned to the class displayed in the Edit Class Details box. |
Class Selection Box
This section of the dialog controls how classes are displayed in the class list. To sort the list, click on a column heading.
|
Classes on or after |
Controls the display of classes in the list. Only classes scheduled on or after the specified date are displayed. |
|
Type |
Limits the classes displayed in the list to the selected class type. To display all classes regardless of class type, clear this field (highlight the field and press the Delete key). |
Edit Class Details Box
The information displayed here is for the highlighted class in the Class Selection box. To enable editing of the fields, double-click the highlighted class.
|
Number |
Displays the number of the selected class. |
|
Description |
The name of the class. This will appear on the letter inviting workers to the class. If you are offering the same class multiple times, each one is considered a separate class and should be differentiated by a different description. For example: Inspector Class (Session A), Inspector Class (Session B), etc. If a single class is divided in to several consecutive segments, with each segment having a different starting time, you should create a class for each segment and use the Description field to indicate they are linked. For instance: Clerk Class (Segment 1 of 3), Clerk Class (Segment 2 of 3), etc. |
|
Date/Time |
The date and time of the class. You can enter AM or PM following the time, if you wish; otherwise, Voter Focus inserts AM when you tab out of the field. The date and time will appear on the letter inviting workers to the class. |
|
Location |
The place where the class will be held; make a selection from the drop-down list. The location Maintenance button opens a dialog where you can manage the locations appearing in the list. Note that deleting a location simply removes it from the drop-down list. It does not delete the location from any classes assigned to a location, either past or future. Edits to an existing location will be reflected in instances where the location is shown with a class, such as the list in the Class Selection box. |
|
Class Type |
The class type to which the class is assigned. See Create a Class Type for more information. |
|
Pay |
The dollar amount a worker is paid to attend the class. |
|
Duration |
The duration of the class in hours. Note that if a class has multiple consecutive segments, a class should be created for each segment, and the Duration value will be for the duration of the individual segment. After a worker attends the class, the hours are added to the total class hours shown in their record. |
|
Max Size |
The maximum number of students permitted in the class. Once this maximum number is reached, additional students cannot be assigned to the class. To prevent over-assignment, the names of full classes do not appear in the list of classes when you are making class assignments. |
|
Letters |
Lets you send a class invitation letter to students assigned to the class. See Print or Email A Class Invitation Letter. |
|
Student List |
Opens the School Schedule Maintenance dialog where you can find workers to assign to the class. See Assign Workers to a Class for more information. |
|
Update (Responded or Attended) |
The Update button next to Responded is used to record workers who responded to the class-invitation letter. See Record Worker Response to a Class Invitation Letter for more information. The Update button next to Attended is used to record worker attendance in the class. See Record Class Attendance for more information. |