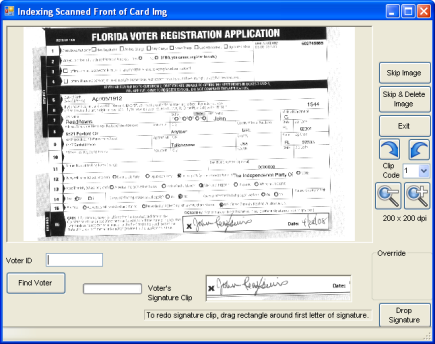
Indexing Scanned Document
To access: VOTER REGISTRATION > Index Images > {batch} > Start Indexing

The Indexing dialog displays, one by one, the images in a selected batch of scanned documents so that you can link each image to the voter's record.
Fields and Controls on this Dialog
|
Voter ID |
If
you are indexing an NVRA (that is, the document's communication
type is C If you are indexing a document that does not include the voter ID, leave this field blank and click Find Voter. |
|
Find Voter |
If you do not know the voter ID, click Find Voter and search for the voter belonging to the scanned document. After you find and select the voter, |
|
Birth Year |
This field appears after you enter a valid voter ID when indexing an NVRA form. Enter the last two digits of the voter's birth year. If the birth year matches the voter ID, the voter's name displays to the right of the Birth Year field. |
|
Voter's Signature Clip |
The image shown in this box is saved as the signature clip associated with the scanned image. If the signature is not properly captured, you can re-clip it by clicking the top-left corner of the signature and dragging the mouse to the bottom-right corner of the signature. You can repeat this process as many times as needed until you capture the full signature in the signature clip area. |
|
Drop Signature |
If the image does not contain a signature, or the signature is unsatisfactory for some reason, click Drop Signature to refrain from saving a signature clip with the image. |
|
Skip Image |
Skips a scanned image so that you can come back to it later in the indexing process. For example, if you cannot find the voter, and want to research their record, you could skip the image for now. In order to complete indexing of the batch, you will need to return to it and index the skipped image. |
|
Skip & Delete Image |
Omits a scanned image from the indexing process. You may do this when the scanned image is unreadable and needs to be rescanned. You would then need to pull the paper document from the batch and rescan it by itself or with another batch. |
|
Close |
Closes the Indexing dialog. The currently displayed image and any images that have not been indexed remain in the batch. Any images that have been indexed to a voter's record and saved are removed from the batch so that when you return to the batch, it will only contain those images that have not been indexed. |
|
|
Zoom out to display the full image. |
|
|
Zoom in on the image. |
|
|
Use these arrows to rotate the scanned image to a more desirable orientation. |
|
Clip Code |
This field appears only when the communication type is 3, Scanned Front of Card Image, or any communication type for voter registration forms. A clip code is a pixel point on an image—defined as a horizontal (X) and a vertical (Y) position—that designates the position of the upper-left corner of the signature clip. Voter Focus calculates the location of the entire signature clip by using the clip code as a starting point. For documents other than voter registration forms, which have no clip code, the image shown in the signature clip box is taken from the upper-left corner of the document. To capture a signature, you will need to re-clip it, as described above in Voter's Signature Clip. Note:
The preset clip codes are specified in VOTER FOCUS ADMIN > System Options > Clip Codes.
|
|
Save |
Links the scanned image to the voter's record. If the document is a voter registration application and its scan date on the Image Batch Selection dialog is the most recent date of any other scanned and indexed applications, a separate image of the signature clip is saved and linked to the voter's record. |
|
Override |
This is a display-only field that shows the coordinates of the signature clip on the scanned image if the original clip has been reclipped by the user. The pair of numbers designated by P1 indicates the pixel location of the upper-left corner of the signature clip. The P2 pair indicates the lower-right corner of the clip. |