Document Layout
To access: PRINTING > Document Maintenance > {document} > Form Layout
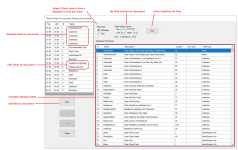
On this dialog you select the database fields that will appear in the document along with their physical position on the document. You can also define text fields that will be inserted into the document at specific locations.
The pane in the top-left corner shows the fields selected for the document.
The larger pane on the right side of the dialog—Database Field Name—displays the database fields available for use on the document. When the document is printed, the contents of the database field for the voter is inserted in the document.
Two fields in the Page Printer Layout box—Top and Left—specify the physical starting points of the field on the document. Valid numbers in these fields are required. The Right field is optional. It specifies the ending point of the field.
- Go to PRINTING > Document Maintenance.
- Select a document type and click Select Document.
- On the Document Maintenance dialog, click Form Layout.
- On the Select Fields on Document dialog, click New.
- Do one of the following:
- Insert a database field:
- In the Field Type box, select Database.
- In the Database Field Name pane, highlight the field you want to include in the document.
- Insert a text field:
- In the Field Type box, select Text.
- The list of database fields will be replaced by a box labeled Text to Print. Type the text for the field in this box.
- Insert a database field:
- In the Page Printer Layout box, enter location values in the Top and Left fields. Top is the beginning location measured vertically from the top of the page. Left is the beginning location measured horizontally from the left side of the page. The numbers you enter should be in 1/10th-inch. So, for example, to set the top of the field at 3.1 inches from the top of the page, enter 31.00 in the Top field.
- To stop the field printing beyond a specific point on the page, enter a number in the Right field. If you leave the value at 0, the field will print as long as is required for the contents, even if that means overlapping an adjacent field.
- The font that is currently selected is shown below the Left field. To select a different font family, style, or size, click Font and make your selections. You can also select to apply strikeout and underline effects.
- Click Save to insert the new field in the document. The field is now listed in the top-left pane.
-
In the top-left pane, highlight the field.
-
Click Delete, and then click Yes to confirm the deletion.
