Configure Wait Times
If your county has a VR Tower website with the Early Voting Locations & Status module, using the Configure Wait Times feature in Web Monitor, you can specify how specific EViD reported wait time ranges (entered in Clerk Utilities > Set Wait Times at each voting location) should appear for early voting location listed on the VR Tower website.
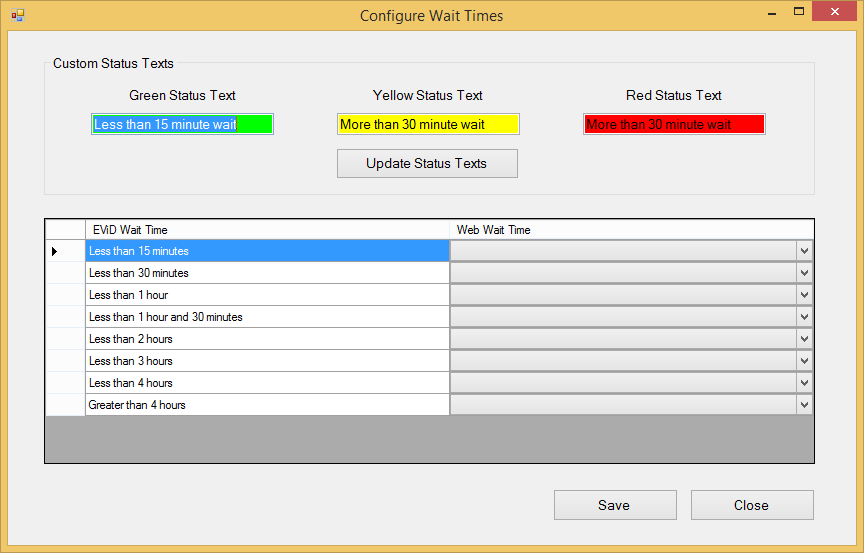
Each EViD reported wait time can be associated with a specific Web Wait Time value, which determines the color that appears in the Status field on the VR Tower website for early voting locations reporting that wait time.
The text that appears for each color can then be set using the Custom Status Texts field.
For example, you can specify that all early voting locations reporting a wait time of "Less than 4 hours" and "Greater than 4 hours" show a Status of red with the text "4 Hours of More" in VR Tower.
-
Go to EViD > Web Monitor and on the right side of the Web Monitor dialog box, click Export Wait Times.
-
Click File > Configure Wait Times.
-
In the Web Wait Time column, select the color you want to associate with the EViD Wait Time value.
-
After you have updated all rows, click Save. If wait times have been uploaded to the VR Tower web site (see Export Wait times for more information), the colors are instantly applied to the Status field.
-
Go to EViD > Web Monitor and on the right side of the Web Monitor dialog box, click Export Wait Times.
-
Click File > Configure Wait Times.
-
For each of the Custom Status Texts fields, enter the text that you want to appear for the EViD Wait Time rows associated with that color in the Web Wait Time column. For example, if you associated the EViD Wait Time rows "Less than 15 minutes" and "Less than 30 minutes" with the value Green, in the Green Status Text field, type "Less than 30 minutes" or "30 minutes of less."
-
Click
 . If wait times have been
uploaded to the VR Tower web site (see Export
Wait times for more information), the text is instantly updated
in the Status field on the
VR Tower website.
. If wait times have been
uploaded to the VR Tower web site (see Export
Wait times for more information), the text is instantly updated
in the Status field on the
VR Tower website.


