Last Update: June 09, 2015 |
Dialog Help
To access: PRINTING > Document Maintenance > {document} > Form Layout

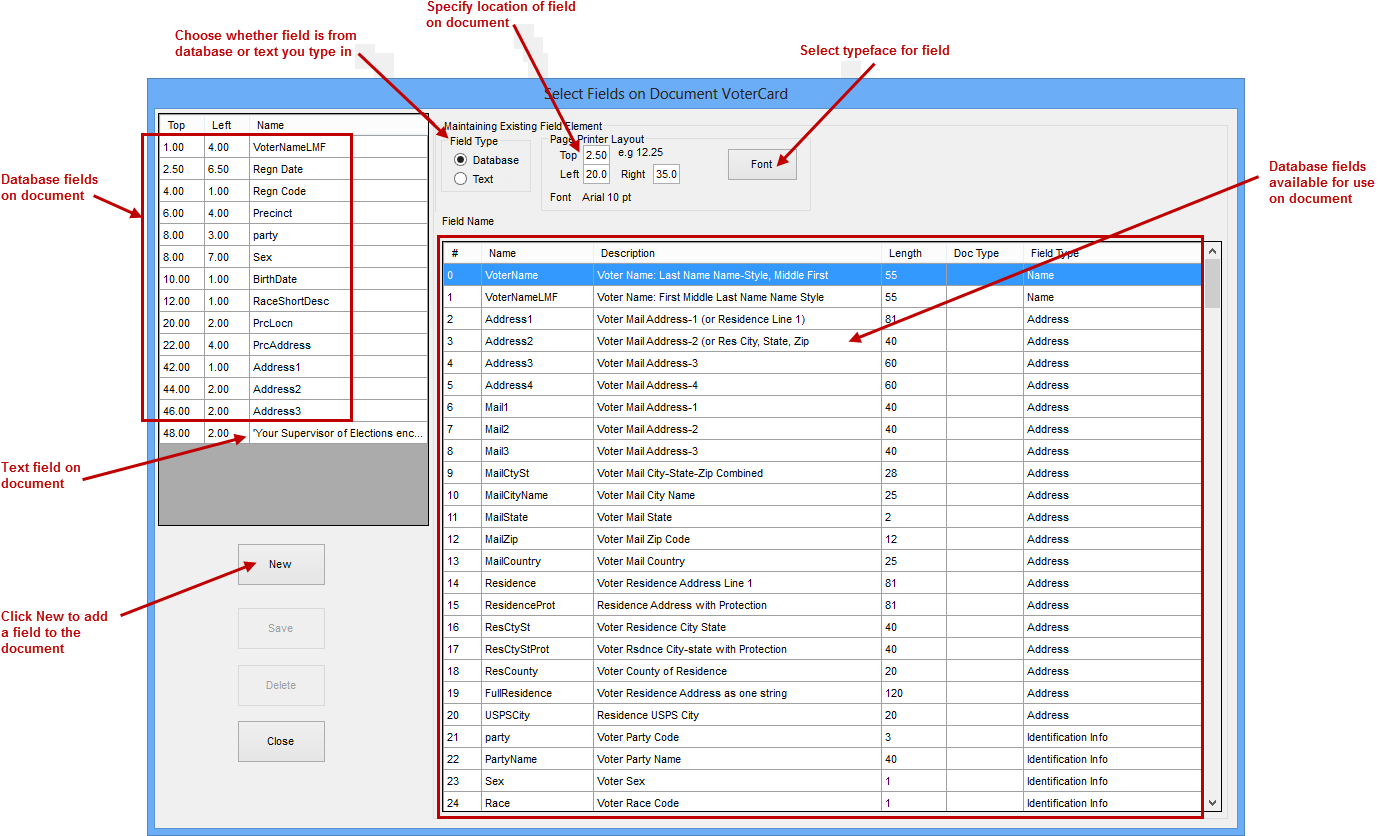
On this dialog you select the database fields that will appear in the document along with their physical position on the document. You can also define text fields that will be inserted into the document at specific locations.
The pane in the top-left corner displaces the fields selected for this document.
The large pane on the right side of the dialog—Database Field Name—displays the database fields available for use on the document. When the document is printed, the contents of the database field for the voter will be placed in the document.
Two fields in the Page Printer Layout box—Top and Left—are for specifying the physical starting points of the field on the document. Valid numbers in these fields are required. The Right field is optional: there you can specify the ending point of the field.
To add a database field to the document:
Click New.
In the Field Type box, select Database.
In the Database Field Name pane, highlight the field you want to place in the document.
In the Page Printer Layout box, enter location values in the Top and Left fields. Top is the beginning location measured vertically from the top of the page. Left is the beginning location measured horizontally from the left side of the page. The numbers you enter should be in 1/10th-inch. So for example, to set the top of the field at 3.1 inches from the top of the page, you would enter 31.00 in the Top field.
If you want to stop the field printing beyond a specific point on the page, enter a number in the Right field to indicate the stopping point. If you leave the value at 0, the field will print as long as is required for the contents, even if that means overlapping an adjacent field.
The font that is currently selected is shown below the Left field. If you want to select a different typeface, type size, or use a bold or italic, click Font and make a selection on the Font dialog.
Click Save to insert the new field into the document. You will now see it listed in the left-hand pane.
To add a text field to the document:
Click New.
In the Field Type box, select Text.
The list of database fields will be replaced by a box labeled Text to Print. Type the text for the field in this box.
In the Page Printer Layout box, enter location values in the same way you would for a database field.
Change the font if you need to.
Click Save to insert the new text field into the document. You will now see it listed in the left-hand pane.
To delete a field from the document:
In the top-left pane, highlight the field.
Click Delete.