Print or Email a Letter to a Worker
Suppose you want to send a letter—either by mail or email—to just one worker. A simple way to do this is through the Send-a-Letter button on the worker's record.
With Send-a-Letter, you can use any Microsoft Word mail merge document for your letter. You need not use a document defined in Document Maintenance. The Send-a-Letter feature fills in the worker's name, address, and any other mail merge fields specified in the document—such as class or election information.
To receive a letter by email, the worker must have a validated email address. Otherwise you will only be able to print the letter. For emailed letters, the text of the Word document is included in the body of the email.
If you need to make changes to the text of the letter, you can edit it during the Send-a-Letter process. Keep in mind that any edits will be saved only for this emailing/printing of the letter. (The edited version is saved in a temporary file that the system discards after the letter is emailed/printed.) If you want to make permanent changes to the letter, you must do that in Word, outside the Send-a-Letter process.
If you want to compose an entirely new letter, you will first need to create an empty document in Word and save it. Then you can select the document during the Send-a-Letter process and add the text and mail merge fields. You might want to have a blank copy of your office's letterhead for just this purpose. If you want to keep a copy of the document you create during the Send-a-Letter process, save it under a different file name after making your edits.
- Go to ELECTION WORKERS > Worker Maintenance and retrieve the worker's record.
- On the General or School tab, click Send a Letter. The Election Worker Merge Document dialog lists the contents of the \Docs folder in I:\VR6Sharedbinaries. You can navigate to a different folder if the document you want isn't in the \Docs folder.
- Highlight the Word document containing the letter you want to send and click Open. The Select Classes for Search dialog shows the classes for which the worker is scheduled.
- Make your selection and click OK. If your letter doesn't reference a class, a selection here doesn't matter; just click OK to continue.
- If the letter references one or more elections, select the election(s) from the drop-down list(s) on the Select Elections for Search dialog. You can select up to five elections. When you've made your selections, click OK. If your letter doesn't reference an election, a selection here doesn't matter; just click OK to continue.
- If you want to open the Word document
for viewing or editing, click Yes
in response to the message Do
you want to preview or customize the letter for this run?.
If you don't care to review the letter, click No
and skip to step 7.
The document opens in Word and the following message displays:
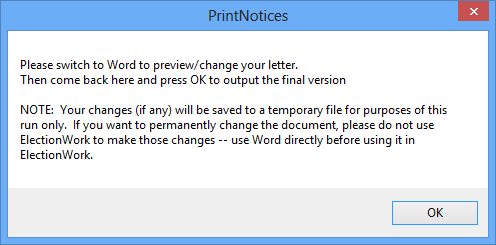
- Go to Word, review the document, and make any edits you want. When you are finished with the letter, return to the message above and click OK. This automatically saves any changes you made in a temporary file for this run and closes the document in Word. (If you don't want to use the edits you just made, close Word and choose to discard the changes before returning to the message above and clicking OK.)
- If the worker has a verified email address,
you will see the Delivery Selection dialog.
If you want to send the letter by email, click Send
Emails to workers with validated Email Addresses. If you want
to print a copy of the letter, click Create
USPS Letters. You can select both, if you want. Click Continue.
If you are only printing the letter, skip to step 8.
If you are sending an email, the email is queued for transmission by the email service and an outgoing-email entry is made on the Comms tab of the worker's voter registration record. You will also see a message like this:
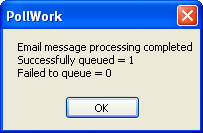
- Click OK to close the message. The Email Status Report opens, showing that the email message is queued for sending. Close the report. If you did not also choose to print the letter, skip to step 9.
- If the worker does not have a validated email address or you only chose Create USPS Letters in step 8, the Windows Print dialog opens. Select the print destination and click OK to print the letter.
- In response to the message Update
EW Communication Date Last Sent?:
- Email only— Click Yes.
- Printed letter— Verify that the letter printed properly. If it did, click Yes to update the Date Last Contacted field on the General tab to today's date. Otherwise, click Cancel to cancel printing of the letter and the update to Date Last Contacted field.
Clicking Yes in response to the update question does several things:
- Adds an entry to the worker's Audit tab.
- Updates the Date Last Contacted field on the General tab to today's date. This update will be seen after you save the worker's record.
- Adds an entry to the worker's Notes tab (which will be seen when you save the worker's record).
- Adds an entry to the Comms and Audit tabs on the worker's voter registration record. If the worker was send an email and mailed a letter, there will be two entries on the Comms tab, one for each delivery method.
- If you need an address label for the letter, click Print Address Label on the worker's General tab.