Run the Get Out the Vote Report
This report gives the county staff (as well as candidates and others who request information) an up-to-the-minute look at who has/has not voted in an election so far. You can output a list of those who have voted, those who haven't, and a list of both, with HAS NOT VOTEDor the date of voting shown for each voter.
The report is output as a Microsoft Excel file. For each voter, it shows their residential address, precinct, and party.
If your county has a VR Tower website, the EViD Get Out the Vote report can be automatically posted to the website for retrieval by candidates with login accounts. For instructions on creating these accounts, see How to Give a Candidate Access to the GOTV Report on Your Website.
To run the Get Out the Vote Report:
- Go to EViD > Get Out the Vote Report.
- On the Get Out the Vote Report dialog,
select a folder where the report will be output.
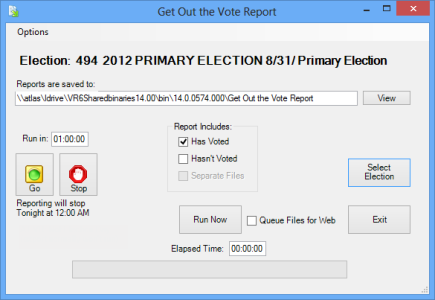
- Click Select Election and choose the election you want to report on.
-
In the Report Includes
box, select the parameters according to the output you want:
- Select Has Voted to list those who have already voted in the report. The report is named Voted.CSV. The right-most column of the report will show the date each voter voted.
- Select Hasn't Voted to list voters who have not yet voted in the election (including those whose voter registration status is Pending). The report is named Not-Voted.CSV. The right-most column of the report will show the text HAS NOT VOTED.
- Select Has Voted and Hasn't Voted to output both groups of voters:
- Clear the Separate Files check box to output the report to a single file, which is named Combined.CSV. Those who voted are listed first, along with the date they voted. The voters who have not yet voted are listed last.
- Select the Separate Files check box to output the two voter lists to separate files named Voted.CSV and NotVoted.CSV.
Note: The text HAS NOT VOTED is not shown in the file NotVoted.csv. - To have the report uploaded to the candidate section on your VR Tower website, select Queue Files for Web. The report will be available there to candidates with a login account.
- To run the report immediately, click Run Now. The report file(s) will be sent to the folder you specified in step 3.
- To have the report run at regular intervals, click Go. The Run In field will show the time left before the next run of the report. By default, the interval is once per hour. To change the interval, on the dialog's menu bar, click Options and enter the hour, minute, and second in the Default Wait Time field. For example, to have the report run once every 30 minutes, enter 00:30:00. Click OK to save the new interval. The automatic runs stop occurring at midnight. To halt the automatic runs before then, click Stop.


